In Journella, you can create as many different journals as you would like!

You can write all your thoughts and memories in one place; but, keep them all separate & easy to find. Think of it this way… You can have a journal to write memories from your childhood, a journal to write about things you are grateful for, a journal to keep notes about your job, journals to remember the funny things your kids say… (the list never has to end!)  Better yet, if one of your entries mentions two subjects (say your job and your family) you can save that entry under both subjects.

WHERE DO I ASSIGN A JOURNAL ENTRY TO A CATEGORY?

When you have completed a journal entry, click on the orange tag icon at the top of the screen. (See image below)

When you click on the tag icon, it will open a pop down window that looks like the image below. Notice the little orange icon next to “Journal Category Names”.

When you click on the orange category icon it will open a pop up window with a list of your Categories. (see example below)

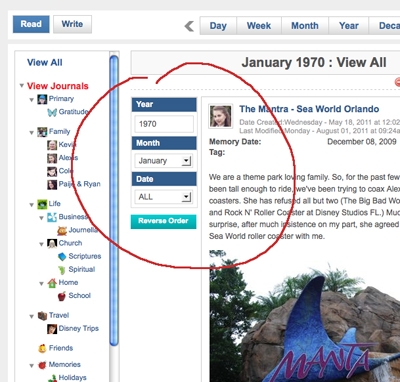
As a default, all journals are set to save in your “Primary” journal. (So, if you never click on the tag icon – all entries will automatically be loaded into your “Primary” category.) You can select different (or more) journal categories by checking the boxes next to your category name(s). (See example below)

Next to the category icon images you will notice that there is a “radio” style (round) button. Only one of these can be selected for each journal entry. The icon selected via the radio button will be the “display icon” for the journal entry.

WHAT IS A DISPLAY ICON?

A “Display Icon” is the icon that is assigned to represent that journal entry on your calendar view. (Notice the artists palette icon in the image below.) This journal entry may be assigned to several different journals but the category of  ”Goals,” represented by the artists palette, has been selected as the “display category.”

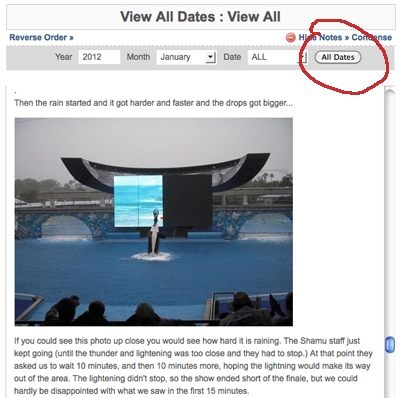
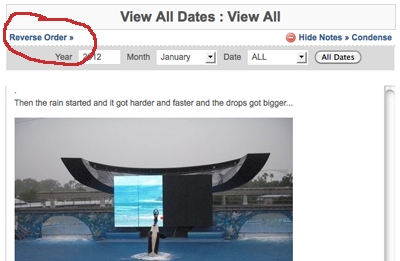
WHERE ELSE CAN I VIEW THE JOURNAL CATEGORY ICONS?

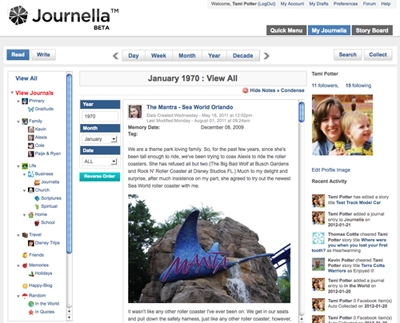
When you are in READ view you will notice the “Display Icon” featured in the top left corner of each entry and any additional categories assigned at the bottom of the entry. (see image below.)

At the bottom of the WRITE/EDIT screen you will notice icons that represent each of the categories to which a journal entry has been assigned. (See image below.)

You can easily remove all journal category assignments EXCEPT the display category. Notice the red x button under the left icon below. With the click of that button, I can quickly remove the journal entry from that category. NOTE that the palette doesn’t have a red button – it was chosen as the display category and cannot be removed until a new/different display category has been assigned.

I’ve added a story to my journal and now I want to share it with my friends.

1. I’ve added a Memory Date (optional)

2. I’ve filled in a Title

3. I’ve assigned one or more categories

4. I’ve written a post (and included images – optional)

See sample WRITE VIEW below:

5. In the top (row of Icons) there is a GLOBE with an ARROW.

To share to the story board first you should click the GLOBE icon.

6. The next step is to select the image that will show on the Story Board “Excerpt View” – if you have only one image it will automatically show in the preview. If you have multiple images you can choose the image desired by clicking the arrows. (see image below)

7. At the bottom of the screen (you may need to scroll down) you will see the “Share to Story Board” button. (see image below.)

8. When you click “SHARE TO STORY BOARDS” you will be directed to select a category for your story.

9. AND at the bottom of the screen you will be given the option to SHARE your story with your facebook friends at the same time you share to the Journella Story Board. (See image below)

You’ve activated your Journal Account and now you are ready to start writing – so where do you begin?

1. Click on the Write button – located just below the Journella® Logo. (see image below)

.

2. In the center of the screen you will see your Write View Editor (see image below)

3. At the top of the WRITE EDITOR you will see a row of Icons.

A.   Pencil icon- is to start a new entry (if you have finished writing/editing your current entry)

B. Disk icon-  SAVE your entry. (There is also a SAVE option at the bottom of the screen)

C. Photo icon -  add photos/ images.

D. ” T ” symbol – open the text formatting options.

E. Tag Icon –  select a category or add tags.

F. Printer Icon – Print entry

G. Lock  - lock and unlock your entry

H. Globe – Share to Journella’s Public Story Board (optional.)

I. Trash – Delete your entry.

4. Below the row of Icons you will find a place to enter your title (Mandatory field) and the option to select a MEMORY DATE (This is an optional field.) Click on the calendar icon to select/assign a new  memory date.

You can add a memory date to journal entries for things that you want to show on your calendar on another date (in addition to the current date.) For example, if  I am writing a memory that happened back on October 24, 1997 – I will add a memory date. The category icon for this entry will show on the calendar date written (current day) and also on the memory date of October 24, 1997.

5. Next you will write your Journal Entry in the blank space below the title – just click the box, your cursor will appear, and you can begin writing and adding images.

6. At the bottom of the screen you will see information about the category (s) assigned, arrows to allow you to increas the size of text box, and a SAVE button.

If you have assigned multiple categories, you will also see a red button with an X below each – with the exception of the Display Category. (The display category assigns the icon that will show on your calendar views.) You can’t delete the display category without assigning a new display category first.)

.

When you are logged into your Journella® account, and in the “MY JOURNELLA SCREEN,”  the right column of screen will show a default profile image. (see image below.)

Under the default profile icon, you will see a link to “EDIT PROFILE IMAGE” – (view image below)

Clicking on the link will take you to the screen to create your profile image (see image below)

If you are logged into your facebook account you can quickly grab the image used there by clicking on the “Use FACEBOOK PROFILE”  button. OR you can use an image on your computer by clicking “Browse.”

STEP 1

Click on the Manage Journals Link in the left menu column. (see image below)

Step 2

Manage Journal Category window will open (see image below.)

You can change or delete any of the categories pre-loaded into your Journella Account. (Except “Primary” – which can be changed but never deleted.)

To ADD a new Journal Category Click the “Add New Category” button.

To EDIT a Category click on the “paper w/ pencil” icon next to the category.

To ADD a Sub-Category Click on the paper w/ green + symbol next to the category. (Example: Family is a category with sub-categories of Dad, Mom, Brother, and Sister.)

To DELETE a category click on the black X icon.

Step 3

Click on Add New Category Button

The “Add New Category” Box Will open (see image below). Be sure to fill in the name of your new category in the box provided before selecting or uploading your icon.

Step 4

Set up an E-mail Prompt (Optional)

When you check the Prompt settings You will see a place to schedule prompts to remind you to write. You can fill in the desired “reminder message” and the length of time between prompts. (see image below)

There are many good reasons to write: writing can help bring clarity to your thoughts, writing will help you achieve goals, and writing will help you be a better communicator. However, my personal all time favorite reason for “writing it down” is because the process has improved my relationships with people I love.

I’ve had a long term relationship with writing. I learned to love the creative medium at an early age. I started out writing poems and short stories. Most were pretty cheesy; but, my mother always told me they were wonderful.

After I married Kevin I began writing about our life together; but, it was mostly a “venting” process -  a way to clear the worries and frustrations of life from my mind.

Years ago, I experienced a little taste of the mind altering power of writing. I was annoyed with Kevin. I didn’t like how it felt; so, I decided to do something about it. I remembered hearing an idea that promised to help. It was a simple exercise to make a list of good things about a person when you are mad at them. Honestly, I wasn’t sure it would work. (I was pretty annoyed with him at the time.) But, I decided to give it a try. I spent the next 30 days writing one good thing each day about Kevin. Before the 30 days ended I had forgotten why I was annoyed. (I still don’t remember.)

A few summers ago, just before our anniversary, I decided to write the story of how Kevin and I met. I spent the next three months reminiscing and writing. As I wrote, I shared the story with Kevin. It was like re-living “falling in love” all over again – only better. We had an amazing summer – feeling closer and more connected than ever before.

Writing creates a permanent record of our thoughts. When we write “good things, loving things, happy things” we create a record of those things that can be easily reintroduced to our minds over and over again.

“Writing it down” has been such a tremendous blessing in my life. I want to share the joy I’ve found. I hope you will join me in a quest to create a permanent record of all the good things in life.

Keeping a journal requires observation, introspect, and sometimes, a little creative flair.

One of my favorite classes in college was freshman English. The instructor was interesting and, more importantly, he gave constructive critiques. My creative writing skills improved significantly during the semester.

He introduced our class to the use of alliteration and urged students to stay away from commonly used words that lack description, like really and very. Thanks to my professor, I try to remember to use more illustrative words, for example: remarkably, extraordinarily, tremendously, decidedly, particularly, assuredly… and I’ve learned that when I am stumped while trying to find a fitting word the thesaurus is a fruitful friend.

He gave me the desire to stretch my vocabulary and put more creative energy into my writing. I became an exceptional writer that semester. Everything I’ve written since ‘freshman english’ has been a literary masterpiece… ;)   okay, I know you are laughing. Did I just hear a snort?

Okay, seriously – I went though some of my old journals. The pages were filled with “rambling mind dumps.” Not that I don’t encourage random mind dumping – it is quite therapeutic; however, sadly, even though I was writing every day, I wasn’t writing about my life. I missed the opportunity to write memories of activities and events while they were fresh on my mind. I only occasionally shared the things that were truly important to me.

I realized I have pages and pages of handwritten words that would put even the most enthusiastic reader (myself included) to sleep. Until I started going back through my old journals hoping to find forgotten memories, I had never considered how or what I was writing. I was disappointed in my work – I knew I’d been taught better.

I was determined to change my journal writing habits. I made a goal to change the way I kept a journal. Memories are precious and time is precious. The time I spend writing should produce something of value, right?

A few of the things that have helped me improve my journals:

1. Journaling by subject - I began creating Journals to help me focus on certain subjects that I wanted to be sure to write about. Sample Journal Subjects: specific people (I like to keep journals for my children), spiritual matters (gratitude, scripture study), events or activities (travel, vacations, holidays), goal journals (to track progress), Knowledge journals (when you are studying about a specific subject)… well I could go on all day. Hopefully I have conveyed the idea. (By the way, Journella™ makes it really easy to Journal by category – check out this post about creating categories.)

2. Story telling - When I am writing memories from the past I think it is helpful to tell it in story form, with a beginning a middle and an end.

3. Keeping Prompt Lists - I don’t always have the time to write in paragraphs. I’ve found that making lists with key thoughts helps me to remember details that would otherwise be forgotten.

Starting in January 2012 I started a new journal project called “Life.in.Lists.” – come take a look may be one of my lists will spark an idea or memory for you.

So, you saved a post to the Journella Story Board and a few days later you notice there’s a typo – OOPS! Now, you are going to have to go back and find your post to do the correction, right? Not at all!

In the upper right corner of each post there is a small gray X. (See an excerpt view image below.)

When you click on the X it will open a menu. As the author of the story, you will see an option to Edit story. Selecting “Edit Story” will take you directly to that story in your edit view.

The same small X appears, with the same options, in the full story view (see image below.)

NOTE: Be sure you click EDIT STORY only – DO NOT “UNSHARE STORY” or all of your comments and cheers will be lost!

Jan 292012

A couple of weeks ago, we were very excited to add our new Recent Activity feature. Before adding the feature, we showed you Journella tips and writing prompts in the right column. (See image below.)

After the Recent Activity & Following Features were added to the site, the right column changed. Now, the “My Journella” view includes a profile image and a list of recent activity by you and those you choose to follow on Journella (see image below.)

During the past week, our focus was to create a better “READ” view.

The old read view – (see image below) had a menu to select the year, month, and day located beside the post.

We decided to improve READ view by relocating this menu to the top of the screen.

This update created a wider area for reading (see image below) - it’s a great improvement; but, we didn’t stop there…

We added a button called “ALL DATES” so, you can now scroll through every item you’ve added to your Journella account without searching on a specific date.

When you click on “ALL DATES” you will see your most recently added item at the top of the READ VIEW – but, If you wish to see the older items first – just hit “reverse.” (see image below.)

I am enjoying the new and improved Journella READ view – I hope you will too! :)

.

I haven’t been home much during the month of September; but, I still managed to get a lot of entries into my Journella™ Account. :)

Screen shot 2011-09-24 at 4.14.18 PM

You could say I have been using facebook, in combination with Journella™, as a Memory Tool. Facebook? Tool? you ask… Yes, you read that correctly. While I am away I send posts to facebook via my cell phone. (see examples below)

Screen shot 2011-09-24 at 4.28.22 PM

Then, when I am home, the status updates I sent to facebook, work for me as journal prompts. The date and time I sent the updates to facebook are automatically saved. When I have a few minutes, I take time to add additional details or photos I need to create “fuller” journal entries.

Terms of Use | Privacy Policy | Contact Us © 2024 Journella LLC | Patent Pending

Find us on Facebook Follow us on Twitter Help us Grow: Help us Grow on Delisous Help us grow on StumbleUpon! Help us grow on Digg! Help us grow on Facebook! Help us grow on Twitter!