Challenge # 23-2013 MMDT Let there be Peace and Joy, Hope and Love this Season!
Greetings Everyone! How are your preparations for Christmas coming along? I think our family will finally get around to decking our halls with something other than moving boxes this week! It has been a very busy month of celebrating “big” 30th Birthdays, Thanksgiving, moving family members, painting baby’s room, another birthday, this time a 24th and then today culminated with a baby shower for the newest member of the family, due in 48 days!
Needless to say, our thoughts and attention has been anywhere but on Christmas. Usually we try to do an advent calendar, devotionals, stories, and decorating to emphasize the “real” Christmas, but sadly we are failing miserably at accomplishing that this year!
So let me fast forward to my project for this challenge. I have used our 12” x 12” sheet of 4x4 RTC paper to create a quick way to pause in the midst of the holiday bustle and be “Still and Know Him”, to be at peace and rejoice!
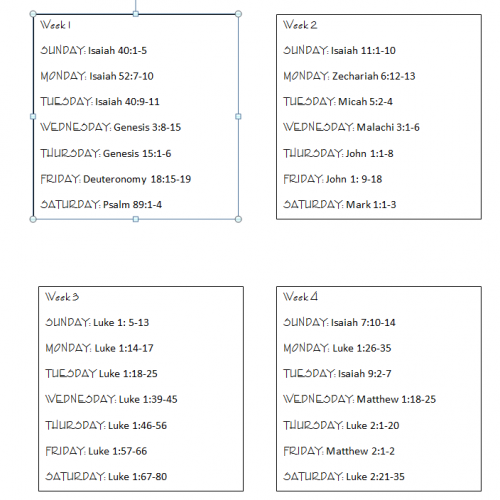
I have created an ornament of sorts, a tiny Advent Explosion Box. On the outside it is decorated with the themes of Advent and inside each flap has four weeks of readings to follow. Instead of lighting four candles over the four week time frame, there’s one battery operated tea light that sends off just enough glow for your reading time. Let me walk you through the steps to make this for yourself.
I began by scoring my black RTC paper 4” in from each end on each side. This creates nine blocks. Then I trimmed away the corner sections.
A second 12” x 12” plain black cardstock page was scored and trimmed leaving a narrow flap on opposite sides to be able to connect the four sides together.
This second section will sit inside the first box, but the sides on this will be trimmed away and replaced by vellum with a series of printed images in silhouette.
I used the largest Spellbinders Square Die to remove the center of each 4" square.
A TIP: When printing on vellum it will take time to dry the ink. Be sure to leave it alone until it dries or it will smear and you’ll have to start over! You may have a slight fuzzy bleed, but it’s okay.
As you can see this is still in the drying process!
Cut your vellum pieces into sections slightly under 4” so that they fit into the “frame”. Tape sides securely in place. Securely attach this finished box to the inside of the outside grid box when it is finished.
I placed the grid sections to the outside of my box and used patterned paper to fill the 3.25” square. I then mounted a Word block that I created with digital supplies.
The lid to the box was made with the same pattern paper used on the sides and cut a 5.5” section, scored each side at .75” and clipped and folded and secured the ends to create a lid.
For the tea light I used one of the ‘leftover’ sections cut away from the center box corners and scored an “X” in the center and folded it back just enough to slip the tea light in, this will hold it in place so it doesn't slide around. It also makes it easier to lift out and in when turning on and off the light.
The verses for each week were printed on parchment and trimmed to fit and taped down.

Now a quick look at all sides of the inside box.
So, there you have it! It’s not too late to start your own advent box, Sunday, December 8th, is the beginning of the second week of Advent…why not come along on the journey?
Thanks for taking time out of your busy holiday events to stop by…
Andrea


